
Back in 2010, I wrote a blog post on our laundry room makeover. You can click the link below and read how it looked back then
We use our laundry room ALL the time!
We enter our house from the back and so it is the first room you see.
Over time things just got out of hand and I always felt a bit of unrest when I entered this room, so it was time for a CHANGE!!
This first picture honestly does not describe how much "STUFF" their was piled everywhere. My hubby said, people don't want to see all that mess, so I picked it up somewhat before photographing the "before" shot.


I had decided that I wanted to do a double board and batten on the wall opposite the washer and dryer so that each person had their own place to hang 2 coats, put their shoes and a basket to put their hats and gloves in. I also wanted a bench so that they could sit down to do all of the above.
I started by measuring the wall and figuring the size of the battens I needed to put 6 on this one wall. I knew I was going to repaint the wall, so I wrote on it quite liberally, making several adjustments.

I had 6 black frames that were 9" across and I knew I wanted one for each person, so it made my measurements a little easier.

The opposite wall in my laundry room has picture frames that I painted green on the inside and I still had plenty of paint, so decided to paint the wall green....well for a day or so!

Once I figured out all my measurements, I went to the local hardware store and they cut everything for me!! I used 5mm MDF because it is so cost effective. I bought the white ones so that I didn't have much touch up to do once they were hung. The entire wall of battens cost be less than 5 euros!!! LOVE IT!


Well, here is the 2 days later when I decided I didn't want a green wall so I used an off white that I purchased in England last year and I love the softness of it so much more! That is the great thing about paint, it is one of the cheapest changes you can make for a dramatic difference!


As you can see in the above pic, once the glue was placed on the back, I lined it up, using a level and pressed firmly to the wall. I had the first level of battens hung in less than 20 minutes.

I knew I wanted to do a double layer so that I could hang a frame in each box, so the 2nd layer went up just as quickly as the first.

Battens on this wall complete!

I had purchased all the wood for the bench and basket holds, so just needed the assistance of my hubby to cut them and put them together. This took a little longer, but we wanted it done so that it was sturdy. I painted each piece of wood prior to cutting it, so that I only had touch ups to do.


I had found SEVERAL pictures on pinterest, so we combined a few ideas and came up with our final project. When you do things on the cheap, it is sometimes hard to look at pinterest because some of the pictures we found, that I would have LOVED, were totally over the top and looked rather expensive!
This was simple enough for what we needed!
 |
| I purchased 7 hooks, because I did complete the smaller adjacent wall in battens, so put a book on that wall for extra space. I used a very heavy super glue to attach the hooks and later my husband sunk a screw into each hook just to anchor it. Due to the wall being solid concrete, we did it the easiest way possible so that we did not have to predrill each hook! |

As you can see, I found very small nails to hang the frames, again, did not want to use something so large so that I had to mess with predrilling.
 |
| Here is the view looking from the hallway in. |
 |
| This picture is a little dark, but wanted to show you that we had purchased these really cheap kitchen cabinets back in 2010 when we did our original makeover and we used them to store small kitchen appliances that we did not use all the time. Well I condensed that all down, took off the doors and took out the 2 drawers and I now can fit 4 clothes baskets perfectly in it so each child has his/her own basket! |

Here is the finished wall and already in full use. The space on the far right is slightly larger as that holds my boots and baskets and my shoes are bigger than my children's, so my husband created more space. One thing I wish I would have done was make the bench slightly larger because it does make it a little more difficult to sit on it when the wall is filled with coats.
Each frame will eventually have the monogram of the person using that space.
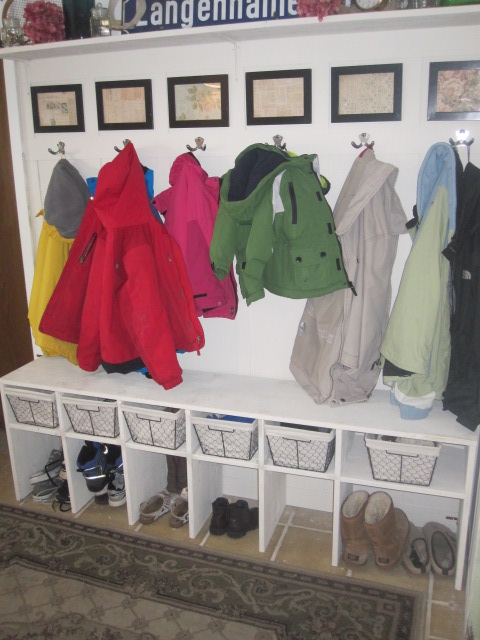
We measured and hung a shelf above so that I could decorate of course!

Looking across to the other side.


You can see the small wall has 1 additional hook. I also took this shot so that you could see the battens on the wall.


Ever since 2010, I started using glass jars to hold my detergent and I love it. I would like to find some vintage tin cups as my scoops, all in good time!

Here is a better shot of the cabinet with 4 baskets. I also have plenty of room to fold clothes as well. The tall cabinet holds all our extra dried and canned goods.

The vintage dresser in the middle is also a great space to fold clothes. It was my grandma's and I love it. It is all chipped up and that is just the way I prefer my furniture!
Well there you have it, my laundry room, now dressed in curtains for a softer look, is now functional and complete! I do hope it stays like this for a long time!!!


4 comments:
Your laundry room looks amazing!! I really love the "lockers" you created!! I can't wait to get a new house with a proper laundry room so that I can copy you :)
I love what you have done with the laundry room. It looks so much better than the beginning picture. I love the additional storage that it gives. I enjoy the lockers.
http://online-phd-uk.co.uk/
It's amazing to arrange everything in the neat and suitable way for the laundry room.
Angela @ Certificate of Tesol
شركة رش مبيدات بالرياض
شركة مكافحة النمل الابيض بالرياض
شركة مكافحة الصراصير بالرياض
شركة مكافحة النمل الاسود بالرياض
شركة مكافحة الفئران بالرياض
شركة مكافحة البق بالرياض
Post a Comment